dinsdag 18 oktober 2016

Microduino Temperature and Humidity sensor and display

Microduino Temperature and Humidity sensor and display
Using Mixly (and a little tweak in Arduino IDE)
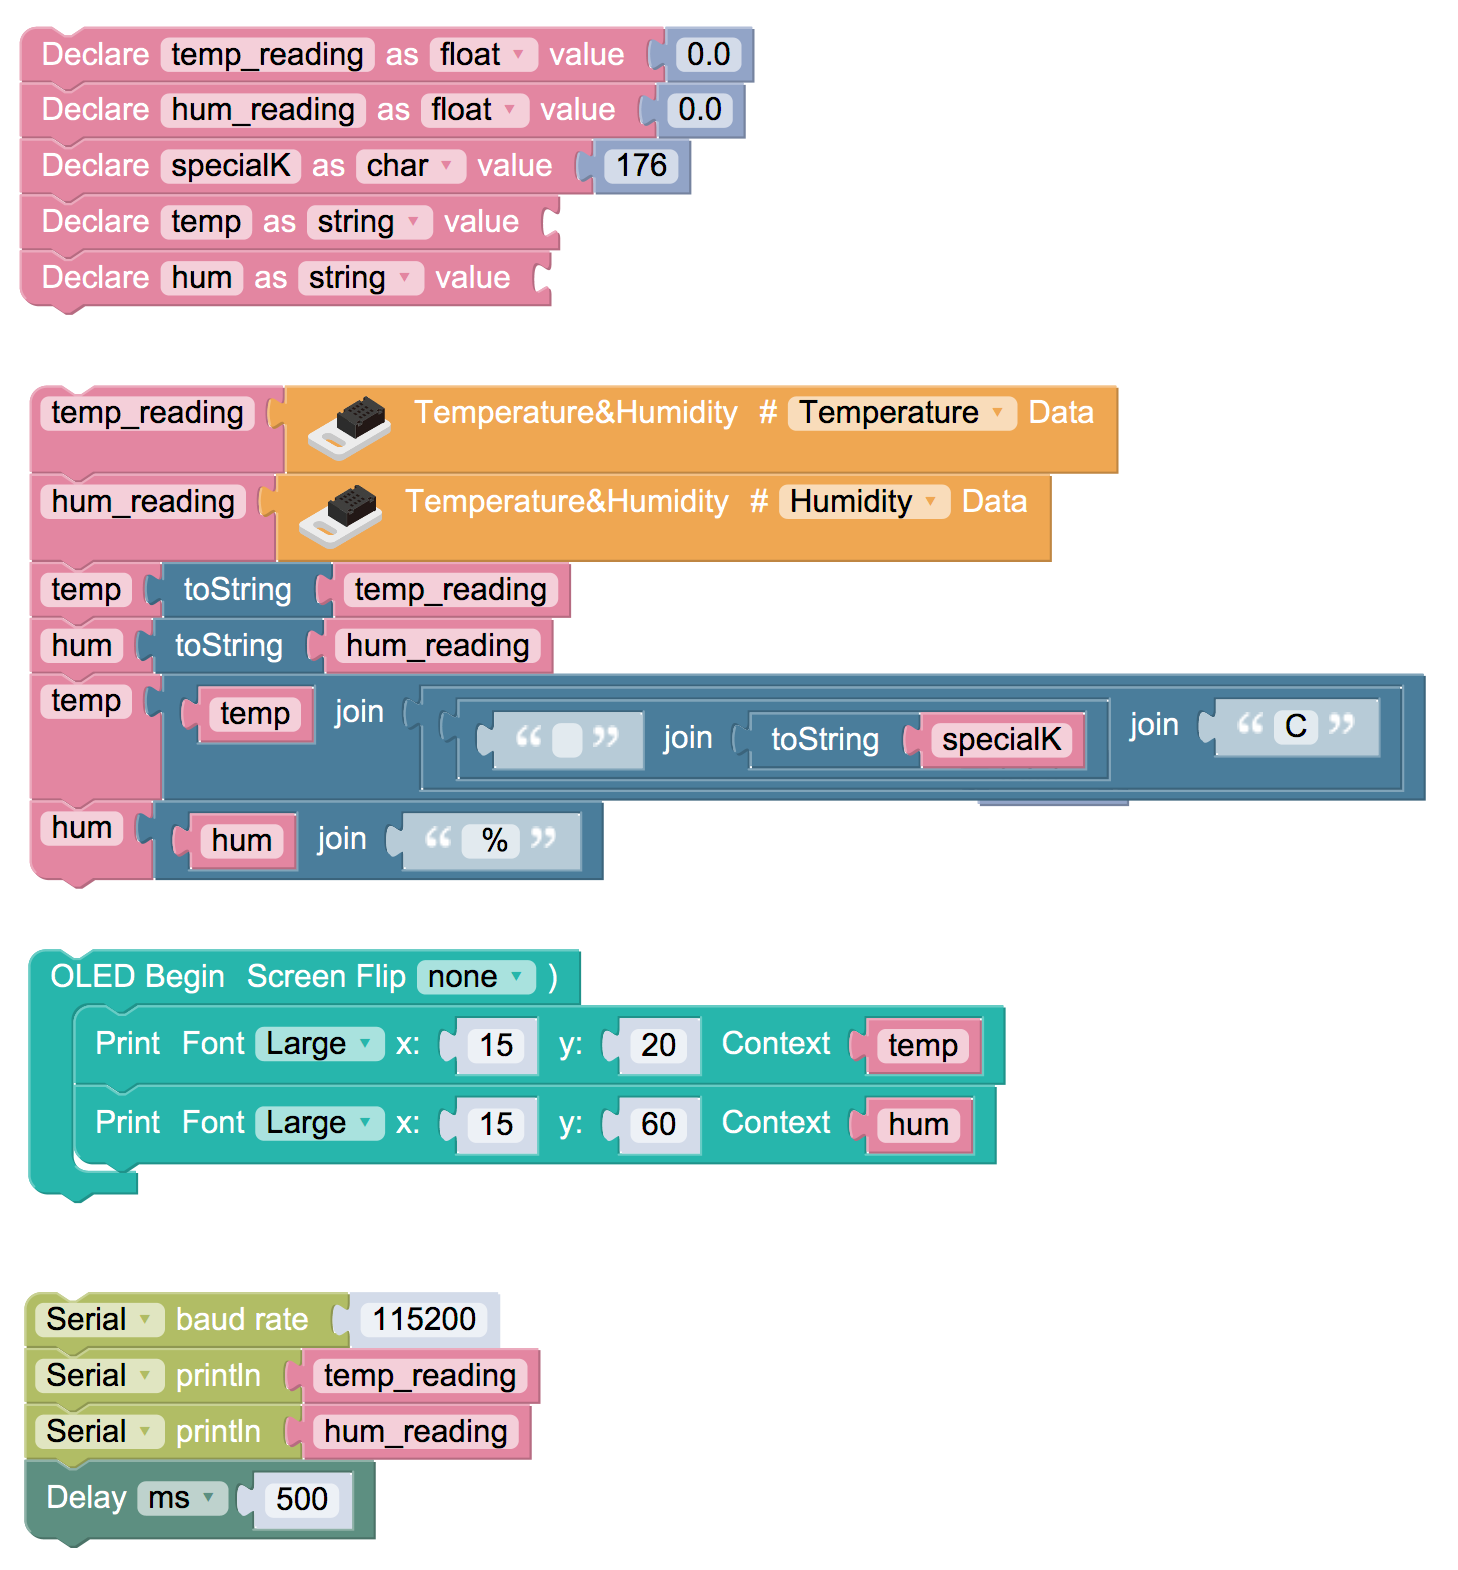


Mixly 'program':


Schermafbeelding 2016-10-18 om 17.27.15.png

In order to display only 1 decimal I tweaked the resulting Arduino sketch in the Arduino IDE:


#include <Wire.h>
#include <AM2321.h>
#include "U8glib.h"


float temp_reading;
float hum_reading;
char specialK;
String temp;
String hum;
float readByAM2321(int num) {
AM2321 am2321;
am2321.read();
float sensor_tem=am2321.temperature/10.0;
float sensor_hum=am2321.humidity/10.0;
delay(500);
if(num==1) {
return sensor_tem;
}
else if(num==2) {
return sensor_hum;
} else {
return 0.0;
}
}


U8GLIB_SSD1306_128X64 u8g(U8G_I2C_OPT_NONE);
#define setFont_L u8g.setFont(u8g_font_fur20)
#define setFont_S u8g.setFont(u8g_font_fixed_v0r)
#define setFont_M u8g.setFont(u8g_font_9x18)


void setup()
{
 temp_reading = 0.0;
 hum_reading = 0.0;
 specialK = 176;
 temp = "";
 hum = "";
 Serial.begin(115200);
}


void loop()
{
 temp_reading = readByAM2321(1);
 hum_reading = readByAM2321(2);
 temp = String(temp_reading, 1);
 hum = String(hum_reading,1);
 temp = String(temp) + String(String(String(" ") + String(String("")+specialK)) + String("C"));
 hum = String(hum) + String(" %");


 int(0);


 u8g.undoRotation();
 u8g.firstPage();
 do {
   setFont_L;
   u8g.setPrintPos(20, 20);
   u8g.print(temp);
   setFont_L;
   u8g.setPrintPos(20, 60);
   u8g.print(hum);
 } while( u8g.nextPage() );


 Serial.println(temp_reading, 1);
 Serial.println(hum_reading, 1);
 delay(500);


}


The 'big' difference is the following:


 temp = String(temp_reading, 1);
 hum = String(hum_reading,1);


I used some LEGO Technics parts to put it all together:

IMG_20161018_172117.jpg

zondag 17 maart 2013

Arduino - Experiment 7a - GPIO port expander

In dit experiment heb ik een MCP23017 16 bit port expander op de Arduino aangesloten. De MCP23017 wordt aangestuurd via I2C.

De chip ziet er als volgt uit:
De Chip heeft GPA0-7 en GPB0-7 poorten en A0-2 voor het I2C adres in te stellen. De chip werkt met een basis adres van 0x20 en kan met deze drie pinnen ingesteld worden op een adres tussen 0x20 en 0x27.

Om de poorten aan te sturen gebruiken we ook een adres. Om de A-reeks aan te sturen gebruiken we adres: 0x12, en de eerste poort: 0x1.

Arduino Sketch:

#include <Wire.h>

const byte  mcp_address=0x20;      // I2C Address of MCP23017 Chip
const byte  GPIOA=0x12;            // Register Address of Port A
const byte  GPIOB=0x13;            // Register Address of Port B

void setup()
{
  //Send settings to MCP device
  Wire.begin();              // join i2c bus (address optional for master)

  // IOCON.BANK defaults to 0 which is what we want.
  // So we are using Table 1-4 on page 9 of datasheet
  
  Wire.beginTransmission(mcp_address);
  Wire.write((byte)0x00); // IODIRA register
  Wire.write((byte)0x00); // set all of bank A to outputs
  Wire.write((byte)0x00); // set all of bank B to outputs 
  Wire.endTransmission();
  
}

void loop()
{
  Wire.beginTransmission(mcp_address);
  Wire.write(GPIOA);      // address bank A
  Wire.write((byte)0x1);  // value to send - pin A1 HIGH
  Wire.endTransmission();
  
  delay(500);

  Wire.beginTransmission(mcp_address);
  Wire.write(GPIOA);    // address bank A
  Wire.write((byte)0x2);  // value to send - pin A2 HIGH
  Wire.endTransmission();
  
  delay(500);
}

Bovengenoemde code laat de leds op pin GPA0 en GPA1 om en om branden:


zondag 9 december 2012

Arduino - Experiment 6 - 16x2 I2C LCD scherm

In dit experiment heb ik een LCD schermpje aangesloten op de Arduino. Dit is handig voor toekomstige experimenten om bijv. bepaalde output te kunnen weergeven.
In veel voorbeelden wordt gebruik gemaakt van seriele output, maar helaas is een laptop met een com-poort steeds lastiger te vinden. Daarom de keus voor een LCD scherm.

Nu heeft zo'n LCD scherm ook wat nadelen, onder andere dat er 8 datalijntjes nodig zijn om iets weer te kunnen geven. Daarom heb ik gekozen voor een seriele versie: een LCD op basis van I2C: een seriele databus voor IC's.


I2C is een bus met een klok (SCL) en data (SDA) lijnen met 7-bits adressering. De bus heeft twee rollen voor nodes: master en slave:
Master node - Node die de klok en slave adressen verstuurt
Slave node - Node die de klok en het adres ontvangt.

De bus is een multi-master bus: een aantal Master nodes kunnen aanwezig zijn. Bovendien is het mogelijk master en slave rollen worden gewijzigd tussen de berichten (nadat een STOP wordt verzonden).

Dit is dus ideaal voor de Arduino, in toekomstige experimenten kunnen er nog een aantal componenten toegevoegd worden aan de Arduino terwijl we het schermpje kunnen blijven gebruiken.

Aansluitingen (LCD - Arduino UNO):
Vcc - 5V
GND - GND
SCL - analoog 5
SDA - analoog 4 

Voor dit experiment heb ik gebruik gemaakt van een stukje sample code, aangepast voor mijn scherm (adres aangepast):

//DFRobot.com

#include <Wire.h>

#include <LiquidCrystal_I2C.h>

LiquidCrystal_I2C lcd(0x20,16,2);  // set the LCD address to 0x20 for a 16 chars and 2 line display

void setup()

{

 lcd.init();                      // initialize the lcd

 // Print a message to the LCD.

 lcd.backlight();

 lcd.print("Het Arduino - de");
 lcd.setCursor(0, 1);
 lcd.print("Lange Programma");

}
void loop()
{
}


En dat ziet er dan zo uit:


zondag 3 juni 2012

Arduino - Experiment 5 - Numerical Keypad

In experiment numero 5 heb ik een numeriek toetsenbordje op de arduino aangesloten. Om zichtbaar te maken welke toets ingedrukt is, gebruikte ik een 7 segments display.

Allereerst heb ik het toetsenbordje aangepast zodat er, als je op een toets drukt, op twee draden 5V komt te staan. De combinatie van HIGH en LOW op de draden is hieronder weergegeven:


De code in de Arduino is als volgt:


const int DraadZwart = 13;
const int DraadGrijs = 12;
const int DraadBruin = 11;
const int DraadPaars = 10;
const int DraadRood = 9;
const int DraadBlauw = 8;
const int DraadOranje = 7;
int StatusZwart = 0;
int StatusGrijs = 0;
int StatusBruin = 0;
int StatusPaars = 0;
int StatusRood = 0;
int StatusBlauw = 0;
int StatusOranje = 0;
#define A 0
#define B 1
#define C 2
#define D 3


void setup() {
pinMode(DraadZwart, INPUT);
pinMode(DraadGrijs, INPUT);
pinMode(DraadBruin, INPUT);
pinMode(DraadPaars, INPUT);
pinMode(DraadRood, INPUT);
pinMode(DraadBlauw, INPUT);
pinMode(DraadOranje, INPUT);
pinMode(A,OUTPUT);
pinMode(B,OUTPUT);
pinMode(C,OUTPUT);
pinMode(D,OUTPUT);    
}


void loop(){
StatusZwart = digitalRead(DraadZwart);
StatusGrijs = digitalRead(DraadGrijs);
StatusBruin = digitalRead(DraadBruin);
StatusPaars = digitalRead(DraadPaars);
StatusRood = digitalRead(DraadRood);
StatusBlauw = digitalRead(DraadBlauw);
StatusOranje = digitalRead(DraadOranje);


if (StatusZwart == HIGH && StatusRood == HIGH && StatusGrijs == LOW && StatusBruin == LOW && StatusPaars == LOW && StatusBlauw == LOW && StatusOranje == LOW) {     
digitalWrite(A,HIGH);
digitalWrite(B,LOW);
digitalWrite(C,LOW);
digitalWrite(D,LOW);  
}   
if (StatusZwart == HIGH && StatusBlauw == HIGH && StatusRood == LOW && StatusGrijs == LOW && StatusBruin == LOW && StatusPaars == LOW && StatusOranje == LOW) {     
digitalWrite(A,LOW);
digitalWrite(B,HIGH);
digitalWrite(C,LOW);
digitalWrite(D,LOW);  

if (StatusZwart == HIGH && StatusOranje == HIGH && StatusRood == LOW && StatusGrijs == LOW && StatusBruin == LOW && StatusPaars == LOW && StatusBlauw == LOW) {     
digitalWrite(A,HIGH);
digitalWrite(B,HIGH);
digitalWrite(C,LOW);
digitalWrite(D,LOW);  

if (StatusGrijs == HIGH && StatusRood == HIGH && StatusZwart == LOW && StatusBruin == LOW && StatusPaars == LOW && StatusBlauw == LOW && StatusOranje == LOW) {     
digitalWrite(A,LOW);
digitalWrite(B,LOW);
digitalWrite(C,HIGH);
digitalWrite(D,LOW);  

if (StatusGrijs == HIGH && StatusBlauw == HIGH && StatusZwart == LOW && StatusBruin == LOW && StatusPaars == LOW && StatusRood == LOW && StatusOranje == LOW) {     
digitalWrite(A,HIGH);
digitalWrite(B,LOW);
digitalWrite(C,HIGH);
digitalWrite(D,LOW);  

if (StatusGrijs == HIGH && StatusOranje == HIGH && StatusZwart == LOW && StatusBruin == LOW && StatusPaars == LOW && StatusBlauw == LOW && StatusRood == LOW) {     
digitalWrite(A,LOW);
digitalWrite(B,HIGH);
digitalWrite(C,HIGH);
digitalWrite(D,LOW);  

if (StatusBruin == HIGH && StatusRood == HIGH && StatusZwart == LOW && StatusGrijs == LOW && StatusPaars == LOW && StatusBlauw == LOW && StatusOranje == LOW) {     
digitalWrite(A,HIGH);
digitalWrite(B,HIGH);
digitalWrite(C,HIGH);
digitalWrite(D,LOW);  

if (StatusBruin == HIGH && StatusBlauw == HIGH && StatusZwart == LOW && StatusGrijs == LOW && StatusPaars == LOW && StatusRood == LOW && StatusOranje == LOW) {     
digitalWrite(A,LOW);
digitalWrite(B,LOW);
digitalWrite(C,LOW);
digitalWrite(D,HIGH);  

if (StatusBruin == HIGH && StatusOranje == HIGH && StatusZwart == LOW && StatusGrijs == LOW && StatusPaars == LOW && StatusBlauw == LOW && StatusRood == LOW) {     
digitalWrite(A,HIGH);
digitalWrite(B,LOW);
digitalWrite(C,LOW);
digitalWrite(D,HIGH);  

if (StatusPaars == HIGH && StatusRood == HIGH && StatusZwart == LOW && StatusBruin == LOW && StatusGrijs == LOW && StatusBlauw == LOW && StatusOranje == LOW) {     
digitalWrite(A,LOW);
digitalWrite(B,HIGH);
digitalWrite(C,LOW);
digitalWrite(D,HIGH);  

if (StatusPaars == HIGH && StatusBlauw == HIGH && StatusZwart == LOW && StatusBruin == LOW && StatusGrijs == LOW && StatusRood == LOW && StatusOranje == LOW) {     
digitalWrite(A,LOW);
digitalWrite(B,LOW);
digitalWrite(C,LOW);
digitalWrite(D,LOW);  

if (StatusPaars == HIGH && StatusOranje == HIGH && StatusZwart == LOW && StatusBruin == LOW && StatusGrijs == LOW && StatusBlauw == LOW && StatusRood == LOW) {     
digitalWrite(A,HIGH);
digitalWrite(B,HIGH);
digitalWrite(C,LOW);
digitalWrite(D,HIGH);  
}
if (StatusZwart == LOW && StatusOranje == LOW && StatusRood == LOW && StatusGrijs == LOW && StatusBruin == LOW && StatusPaars == LOW && StatusBlauw == LOW) {     
digitalWrite(A,HIGH);
digitalWrite(B,HIGH);
digitalWrite(C,HIGH);
digitalWrite(D,HIGH);  

}


En uiteindelijk ziet het er dan zo uit, wanneer er niets ingedrukt wordt is het display uit. Zo kun je ook zien dat er een ´0´ ingedrukt wordt.